NodeJS async_hooks API与CLS(Continuation-local-storage)

async_hooks

async_hooks是nodejs在8.2.1后引入的特性,目前仍然是Experimental状态。它被用来追踪NodeJS中异步资源的生命周期。

在async_hooks特性加入之前,想要了解异步调用上下文或追踪异步调用逻辑是件比较困难的事情:

  • 最早在v0.11中有实现AsyncListener,但在v0.12时被移除
  • 在Node6和7时,有非官方的AsyncWrap实现,指定回调函数监听异步资源的创建、调用前、调用后时机

async_hooks友好地解决了异步资源创建、调用的追踪问题:

  • 异步资源代表一个关联了回调的对象,回调可能被调用1次或多次,比如net.createServer()里的connect事件或fs.open()AsyncHook不区分这些场景,统一视作异步资源
  • 每一个异步上下文都有一个关联的id,即asyncId。asyncId是从1开始递增的,同一个async上下文中的id相同(在未enable async hook时,promise执行不会被分配asyncId)。executionAsyncId()可以获取当前异步上下文的asyncId,triggerAsyncId()获取触发当前异步上下文的异步上下文。借助asynId和triggerAsyncId可以追踪异步的调用关系和链路。
  • async_hooks.createHook()函数可以注册异步资源生命周期中init/before/after/destroy/promiseResolve事件的监听函数
1
2
3
4
5
6
7
8
9
10
11
12
13
14
15
16
17
18
19
20
21
22
23
const async_hooks = require('async_hooks')
// ID of the current execution context
const eid = async_hooks.executionAsyncId()
// ID of the handle responsible for triggering the callback of the
// current execution scope to call
const tid = async_hooks.triggerAsyncId()
const asyncHook = async_hooks.createHook({
// called during object construction
init: function (asyncId, type, triggerAsyncId, resource) { },
// called just before the resource's callback is called
before: function (asyncId) { },
// called just after the resource's callback has finished
after: function (asyncId) { },
// called when an AsyncWrap instance is destroyed
destroy: function (asyncId) { },
// called only for promise resources, when the `resolve`
// function passed to the `Promise` constructor is invoked
promiseResolve: function (asyncId) { }
})
// starts listening for async events
asyncHook.enable()
// stops listening for new async events
asyncHook.disable()

executionAsyncId和triggerAsyncId

调用executionAsyncIdtriggerAsyncId函数获取当前异步上下文的asyncId和triggerAsyncId。

executionAsyncId的返回值由运行时决定,triggerAsyncId可以返回当前上下文的触发原因上下文id。见下面的示例代码:

1
2
3
4
5
6
7
8
9
10
11
12
13
14
15
16
17
const server = net.createServer((conn) => {
// Returns the ID of the server, not of the new connection, because the
// callback runs in the execution scope of the server's MakeCallback().
async_hooks.executionAsyncId();
// The resource that caused (or triggered) this callback to be called
// was that of the new connection. Thus the return value of triggerAsyncId()
// is the asyncId of "conn".
async_hooks.triggerAsyncId();
}).listen(port, () => {
// Returns the ID of a TickObject (i.e. process.nextTick()) because all
// callbacks passed to .listen() are wrapped in a nextTick().
async_hooks.executionAsyncId();
// Even though all callbacks passed to .listen() are wrapped in a nextTick()
// the callback itself exists because the call to the server's .listen()
// was made. So the return value would be the ID of the server.
async_hooks.triggerAsyncId();
});

createHook

更常用地,我们使用async_hooks.createHook创建异步资源的钩子,注册异步资源生命周期各阶段的回调函数,目前支持init/before/after/destroy/promiseResolve这几种。

注意:打印信息到控制台也是一个异步操作,console.log()会触发AsyncHooks的各个回调。因此AsyncHook回调内使用console.log()或类似异步日志打印,会造成无限递归。一种解决办法是使用fs.writeFileSyncprocess._rawDebug这种同步日志操作。

1
2
3
4
5
6
7
8
9
const fs = require('fs');
const util = require('util');

function debug(...args) {
// Use a function like this one when debugging inside an AsyncHooks callback
fs.writeFileSync('log.out', `${util.format(...args)}\n`, { flag: 'a' });
// OR
process._rawDebug(`${util.format(...args)}\n`);
}

init(asyncId, type, triggerAsyncId, resource)

可能会触发异步事件的资源构造时调用。这不代表后面的before/after事件回调会在destroy回调触发,只是说有这个可能。举个例子:

1
2
3
require('net').createServer().listen(function() { this.close(); });
// OR
clearTimeout(setTimeout(() => {}, 10));

参数解释如下:

  • asyncId 异步资源id
  • type 异步资源类型,字符串枚举值,具体参见官方文档
  • triggerAsyncId 触发当前异步资源创建的异步上下文的asyncId
  • resource 被初始化的异步资源对象

triggerAsyncId表示的是资源创建的原因,async_hooks.executionAsyncId()表示的是资源创建的时机。如下面例子里体现的一样:

1
2
3
4
5
6
7
8
9
async_hooks.createHook({
init(asyncId, type, triggerAsyncId) {
const eid = async_hooks.executionAsyncId();
fs.writeSync(
1, `${type}(${asyncId}): trigger: ${triggerAsyncId} execution: ${eid}\n`);
}
}).enable();

require('net').createServer((conn) => {}).listen(8080);

nc localhost 8080后,打印信息如下:

1
2
TCPSERVERWRAP(5): trigger: 1 execution: 1
TCPWRAP(7): trigger: 5 execution: 0

before(asyncId)

在异步操作初始化完成(如TCP服务器接收新连接)或资源准备完成(写数据到磁盘),准备执行回调时触发。入参asyncId即这个异步资源的ID。before事件可能会触发0~N次。

  • 0次,异步操作被撤销
  • > 1次,持久化的异步资源,如TCP服务器

after(asyncId)

回调执行完成后立即触发。当执行回调过程中有未捕获异常,会在触发“uncaughtException”事件后触发。

destroy(asyncId)

当asyncId对应的异步资源被销毁时调用。有些异步资源的销毁要依赖垃圾回收机制,所以当引用了传递到init函数的resource时,destory事件可能永远不会被触发,从而造成内存泄漏。

promiseResolve(asyncId)

当Promise构造器中的resolve函数被执行时,promiseResolve事件被触发。有些情况下,有些resolve函数是被隐式执行的,比如.then函数会返回一个新的Promise,这个时候也会被调用。

new Promise((resolve) => resolve(true)).then((a) => {});语句执行时,会顺序触发下列函数:

1
2
3
4
5
6
init for PROMISE with id 5, trigger id: 1
promise resolve 5 # corresponds to resolve(true)
init for PROMISE with id 6, trigger id: 5 # the Promise returned by then()
before 6 # the then() callback is entered
promise resolve 6 # the then() callback resolves the promise by returning
after 6

AsyncHook实例定义好后,需要通过enable开启。可以使用disable关闭AsyncHook的回调执行。

下面是一个AsyncHook的实例:

1
2
3
4
5
6
7
8
9
10
11
12
13
14
15
16
17
18
19
20
21
22
23
24
25
26
27
28
29
30
31
32
let indent = 0;
async_hooks.createHook({
init(asyncId, type, triggerAsyncId) {
const eid = async_hooks.executionAsyncId();
const indentStr = ' '.repeat(indent);
fs.writeSync(
1,
`${indentStr}${type}(${asyncId}):` +
` trigger: ${triggerAsyncId} execution: ${eid}\n`);
},
before(asyncId) {
const indentStr = ' '.repeat(indent);
fs.writeFileSync('log.out', `${indentStr}before: ${asyncId}\n`, { flag: 'a' });
indent += 2;
},
after(asyncId) {
indent -= 2;
const indentStr = ' '.repeat(indent);
fs.writeFileSync('log.out', `${indentStr}after: ${asyncId}\n`, { flag: 'a' });
},
destroy(asyncId) {
const indentStr = ' '.repeat(indent);
fs.writeFileSync('log.out', `${indentStr}destroy: ${asyncId}\n`, { flag: 'a' });
}
}).enable();

require('net').createServer(() => {}).listen(8080, () => {
// Let's wait 10ms before logging the server started.
setTimeout(() => {
console.log('>>>', async_hooks.executionAsyncId());
}, 10);
});

在启动服务器后,打印信息如下:

1
2
3
4
5
6
7
8
9
10
11
12
TCPSERVERWRAP(5): trigger: 1 execution: 1
TickObject(6): trigger: 5 execution: 1
before: 6
Timeout(7): trigger: 6 execution: 6
after: 6
destroy: 6
before: 7
>>> 7
TickObject(8): trigger: 7 execution: 7
after: 7
before: 8
after: 8

异常处理

可以直接参考官方文档描述

可以用来干嘛

一个最为人知的使用场景是我们下面会提到的CLS(Continuation-local-storage)。cls-hooked库通过async_hooks建立了context对象和当前async执行上下文的关系,从而在整个执行链(execution chain)上维护一个统一的数据存储。

还有一个是结合Performance Timing API这样的性能监测工具诊断整个异步操作流程的性能。比如这篇文章所介绍的。

参考

CLS

Continuation-local storage(CLS)类似线程编程里的线程存储,不过基于nodeJS风格的链式回调函数调用。它得名于函数式编程中的Continuation-passing style,旨在链式函数调用过程中维护一个持久的数据。

在node V8之前,分别基于AsyncListener和AsyncWrap实现。在V8后,基于async_hook实现的库名为cls-hooked。但使用方法一致。

这里借用cls README里的一个例子。假设你写了一个获取用户信息的模块,将获取到的用户信息放在session中。

1
2
3
4
5
6
7
8
9
10
11
12
13
14
15
16
// setup.js

var createNamespace = require('cls-hooked').createNamespace;
var session = createNamespace('my session');

var db = require('./lib/db.js');

function start(options, next) {
db.fetchUserById(options.id, function (error, user) {
if (error) return next(error);

session.set('user', user);

next();
});
}

之后,需要将用户信息转化为一个HTML文档,你在另外一个文件中定义了转换函数,并从session中取出你想要的用户信息。

1
2
3
4
5
6
7
8
9
10
11
// send_response.js

var getNamespace = require('cls-hooked').getNamespace;
var session = getNamespace('my session');

var render = require('./lib/render.js')

function finish(response) {
var user = session.get('user');
render({user: user}).pipe(response);
}

使用

cls的使用围绕namespace展开,你可以根据需要自由组织namespace,需要持久化的信息读写在namespace的context上进行。

  • cls.createNamespacecls.getNamespace 创建和获取一个namespace
  • cls.destroyNamespacecls.reset 删除一个namespace和重置所有namespace
  • ns.getns.set 在namespace的context上读取和设置持久化数据
  • ns.runns.runAndReturnns.runPromise 在给定context下执行函数
  • ns.bindns.bindEmitter 绑定context到给定函数或eventEmitter
  • context 维护持久化数据的plain object

更多API参考文档

实现原理

正如上面所说,“cls-hooked库通过async_hooks建立了context对象和当前async执行上下文的关系”。下面有张图通过例子描述了cls的工作过程:
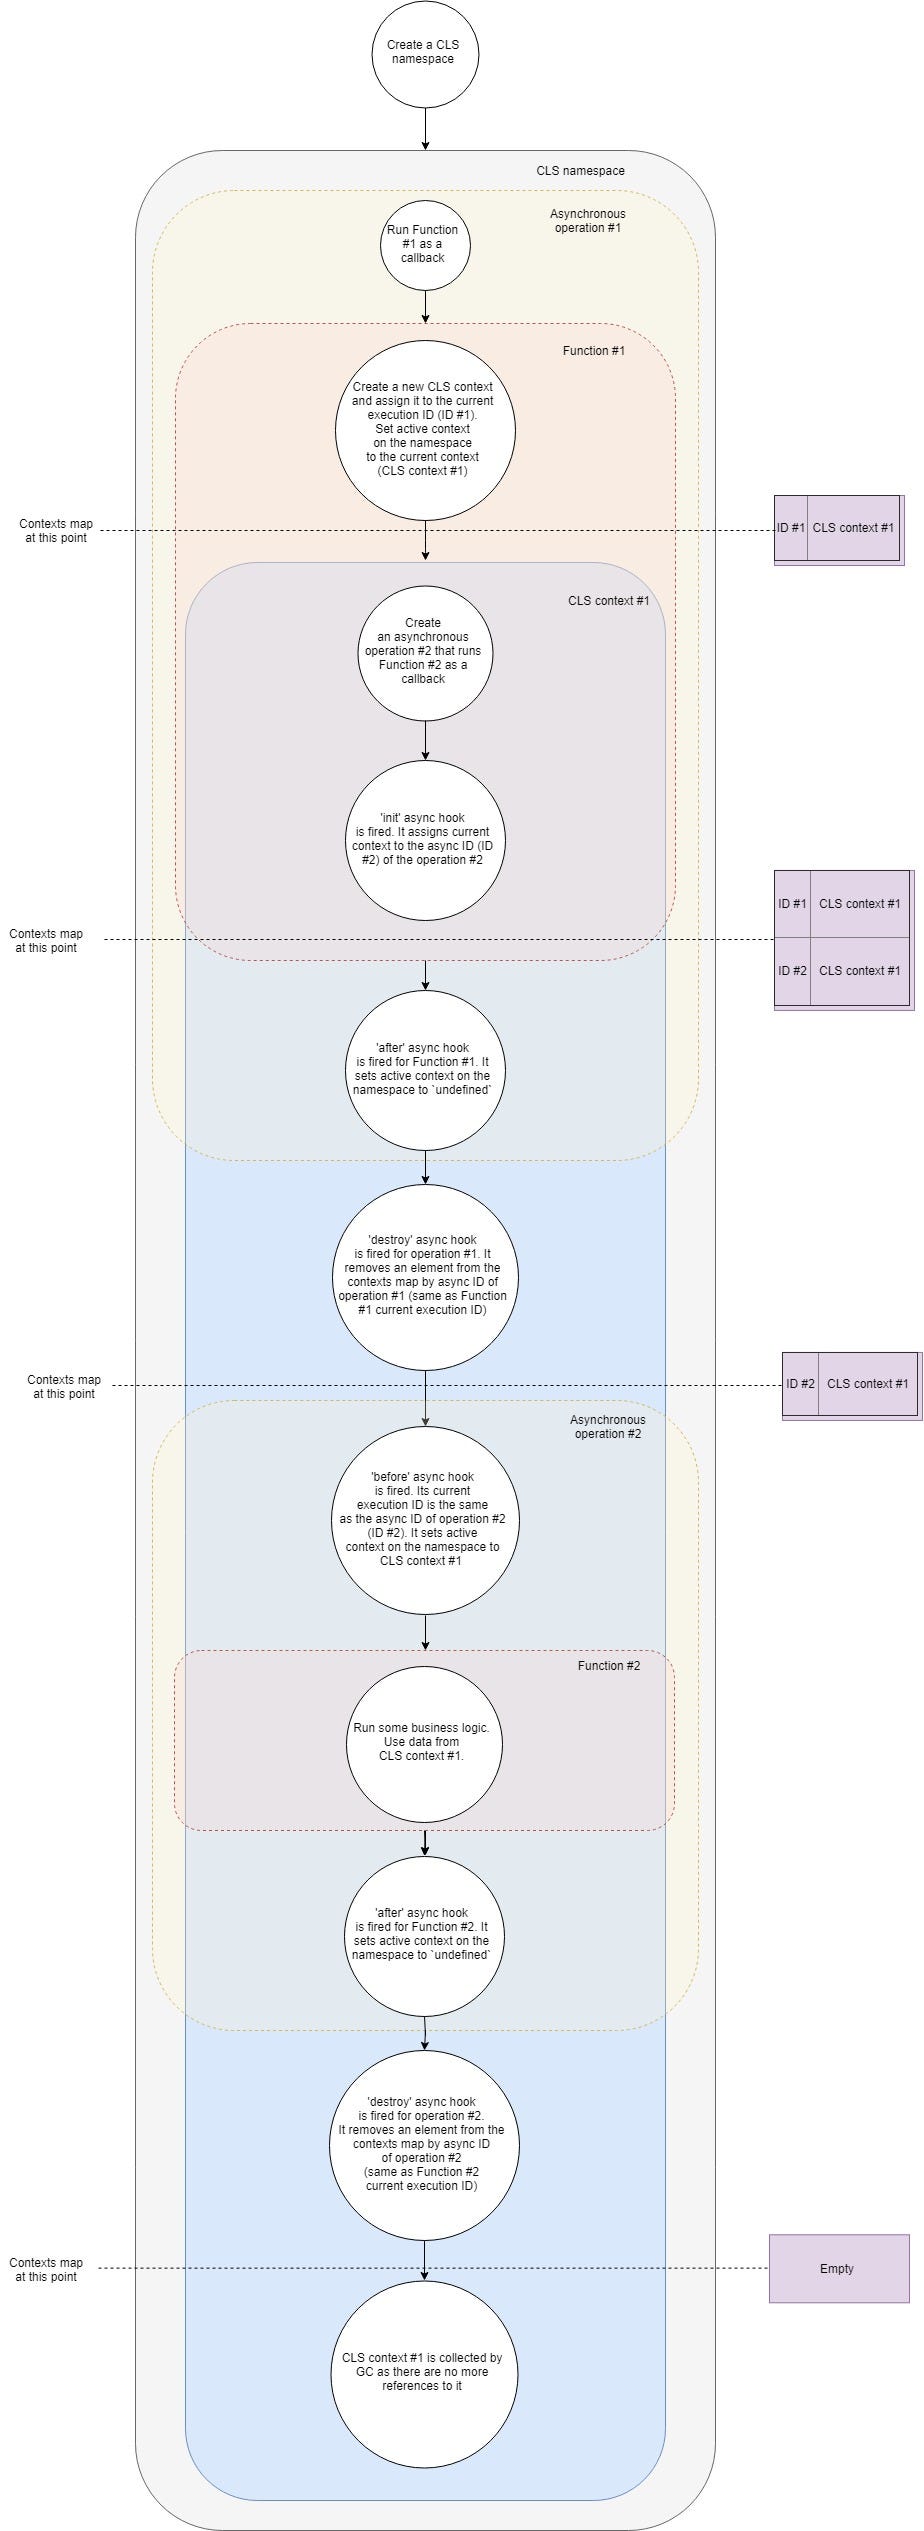
CLS workflow

简单拆解一下:

  • 首先,我们有一个典型的web server和应用上的中间件,我们在整个应用的生命周期里创建一个cls的namespace。
  • 新请求到达中间件时,cls通过ns.run(别的方式也行)创建一个空的cls context,并入栈该context,设置为active context。
  • 由于cls内部注册了AsyncHook,在init阶段,在Map中关联对应active context到当前asyncId。从而有异步操作(如查数据库)时,此前入栈的context就和操作的asyncId对应上。此后get
    、set操作都会针对同一active context进行。
  • 异步操作完成后,after回调触发,active context变成undefined,同时出栈当前context。当destroy回调触发时,会将关联到asyncId的context从Map中移除。

在cls-hooked实现中,

  • ns.getns.setns.active相关联
  • ns.active通过ns.enterns.exit变更或者在init回调中从contextMap中改变。
  • ns.enterns.exitinit回调最终都经由ns.runxxxns.bindxxx得到初始的context
  • cls-hooked借助async_hook和ns.enterns.exit保证异步流程中context和异步上下文的正确对应关系

考虑到cls-hooked的js代码可读性,可维护性和工程角度上还有改善空间,基于上面的原理,做了ts的重构,源码见这里(待补充),供大家参考和学习cls-hooked。

追踪logId

醉翁之意不在酒

有了cls的帮助,我们就可以利用它帮我们持久化logId,避免“continuation-passing-context”。可以写一个中间件,为req、res包装context,同时为每次请求持久化logId。在后面的controller、services这些位置就可以拿到之前持久化的logId。

一个express风格的中间件类似下面这样:

1
2
3
4
5
6
7
8
9
10
11
12
13
14
15
16
17
18
19
20
21
22
23
const cls = require('cls-hooked')
const uuidv4 = require('uuid/v4')

const clsNamespace = cls.createNamespace('app')

const clsMiddleware = (req, res, next) => {
// req and res are event emitters. We want to access CLS context inside of their event callbacks
clsNamespace.bind(req);
clsNamespace.bind(res);

const logId = uuidv4();

clsNamespace.run(() => {
clsNamespace.set('logId', logId);

next();
})
}

// controller.js
const controller = (req, res, next) => {
const traceID = clsNamespace.get('logId');
}

在这个思路的基础上,有类似cls-rtracercls-proxify这样的库,提供针对express、koa、fastify等常见后端框架的中间件,只需简单指定配置,便可以在请求的生命周期里透传logId,免去“continuation-passing-context”的尴尬,对已有代码侵入性也很小。有需要透传logId,但并不想(或暂时不能)使用后端框架的场景下可以考虑使用这种方案。

参考